 A Magidome guide
How to Build a Geodesic Dome: Step-by-Step Assembly Guide for Beginners
Geodesic dome connectors are the foundation of any successful dome build, linking struts together to form the structure's iconic triangular geometry.
What You Need to Know Before Building Your First Dome
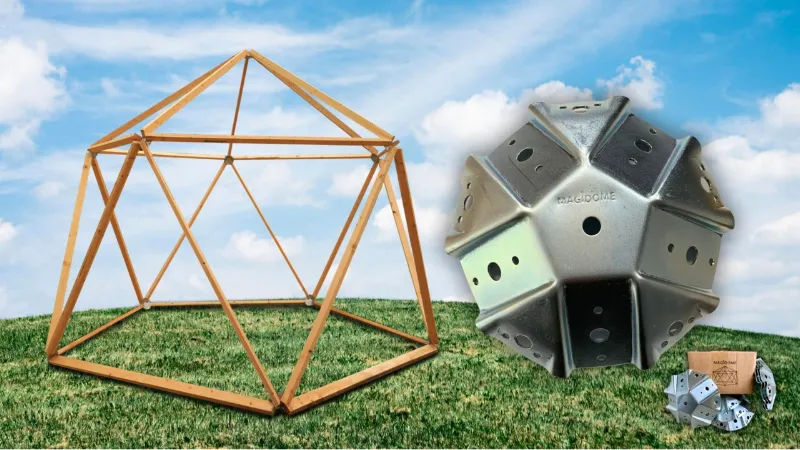
Geodesic dome connectors are the foundation of any successful dome build, linking struts together to form the structure’s iconic triangular geometry. Whether you’re assembling a geodome kit for your backyard or sourcing individual geodesic dome connectors for a custom project, understanding the assembly process transforms what looks complex into a manageable weekend build.
Choosing the Right Geodesic Dome Connector Kit for Your Project
The connector type determines your entire build approach. Metal geodesic dome connectors offer durability for permanent outdoor structures, while 3D-printed options suit temporary installations or prototypes. Most beginners succeed with a complete geodesic dome connector kit that includes pre-calculated strut lengths and matched hardware.
Connector material options:
- Cast aluminum or steel hubs: weather-resistant, supports larger spans, ideal for garden domes or greenhouses
- Injection-molded plastic: lightweight, affordable, works well for indoor domes or seasonal structures
- DIY 3D-print geodesic dome connectors: customizable geometry, requires accurate printer calibration and strong filament like PETG or nylon
- Bolt-together flat plates: easier to transport, adjustable angles for 2v or 3v geodesic dome connectors
Before purchasing, confirm the frequency rating matches your design. A 2v geodesic dome uses fewer, longer struts and larger triangles, while 3v geodesic dome connectors create a more spherical shape with shorter struts but require more connection points. For most backyard projects under 16 feet in diameter, 2v designs balance simplicity with structural integrity.
Check the latest pricing and grab our discount code to save on complete kits with all the connectors and hardware you need.
Preparing Your Materials and Workspace
Accurate preparation prevents assembly headaches. Lay out all connectors and sort them by type if your geo dome uses multiple hub configurations. Most geodesic designs require two or three different strut lengths, labeled A, B, and sometimes C.
Pre-assembly checklist:
- Flat, level ground or foundation (gravel base, deck, or concrete pad)
- All struts cut to exact length with ends prepped for connector attachment
- Fasteners sorted by size (typically bolts, washers, lock nuts)
- Assembly diagram printed with each strut labeled by position
- At least two people for domes over 10 feet in diameter
- Step ladder or scaffolding for top sections
If you’re working with geodesic dome connectors for 2×4 lumber, verify each board is straight and free of large knots near the connection points. Warped struts create stress concentrations that can crack connectors under load. Sand the ends smooth so they seat fully in the hub sockets.
Step-by-Step Assembly Process
We recommend the “base-up” method for beginners. Start with the bottom pentagon or hexagon ring, then work upward in complete rows until you reach the top cap.
Assembly sequence:
- Build the base ring: Connect five or six struts using the appropriate connectors to form the foundation. Temporarily stake or weight this ring to prevent shifting.
- Add the first elevated row: Attach struts from each base connector upward at the calculated angle. These typically alternate between two different lengths depending on your frequency.
- Complete each horizontal tier: Work around the dome’s circumference before moving to the next level. This keeps the structure balanced and prevents racking.
- Install cross-bracing: As you build upward, some connectors link three or more struts from different angles. Follow your diagram carefully here, as mistakes compound quickly.
- Position the top cap: The final pentagon or hexagon requires coordination. Have helpers support the structure while you bolt the last connections. A cupola kit can be integrated at this stage if you want ventilation or skylight access.
- Tighten all fasteners: Once the geometry is complete, work systematically around the dome tightening every bolt to spec. Use a torque pattern that distributes stress evenly.
For visual learners, this Cardboard Geodesic Dome tutorial demonstrates the basic triangulation principle at small scale before you commit materials to a full build.
Common Connector Mistakes and How to Fix Them
We’ve seen these issues trip up first-time builders repeatedly. Catching them early saves hours of disassembly.
Strut length confusion: Using an A-length strut where a B-length belongs throws off the entire geometry. Double-check each piece against your cut list before bolting. If the dome won’t close at the top, this is usually the culprit.
Loose connections: Hand-tight isn’t enough. Geodesic structures rely on tension and compression balanced across all members. Use lock washers or nylon-insert nuts to prevent vibration loosening over time.
Forcing misaligned connectors: If a hub won’t accept the strut angle, stop. Forcing it can crack the connector or bend the strut. Verify you’re at the correct position in the build sequence and that the strut length matches the plan.
Skipping the foundation: Even temporary domes need a level base. An unlevel start compounds with each row, leaving gaps at the top or creating a lean. Use shims or adjustable feet on the base connectors to correct minor slope.
Manufacturers like those featured in Natural Spaces Domes’ component guide often provide support for troubleshooting specific connector systems.
DIY Geodesic Dome Connectors vs. Pre-Made Kits
| Approach | Best For | Considerations |
|---|---|---|
| Complete geodome kit | First build, standard sizes | Faster assembly, guaranteed fit, limited customization |
| Separate connector kit + cut lumber | Custom dimensions, 2×4 builds | Requires precise cutting, more planning, lower material cost |
| 3D-printed hubs | Prototypes, small domes | Print time adds up, strength limits, design freedom |
DIY geodesic dome connectors appeal to makers who want full control over size and materials. If you go this route, the hub-making guide at Geo-Dome UK covers fabrication techniques for wooden and metal custom connectors. Budget extra time for testing connector strength before committing to the full structure.
For most backyard projects, we find pre-engineered connector kits deliver better results with less frustration. The engineering is proven, replacement parts are available, and assembly instructions are specific to your exact hardware. Visit our store page to compare current options and apply our exclusive discount.
Finishing Your Dome and Next Steps
After assembly, inspect every joint and walk the perimeter looking for gaps or misalignment. A properly built geodesic dome should feel rigid with minimal flex when you push on the struts.
Post-assembly tasks:
- Apply weatherproofing to wooden struts (exterior stain or sealant)
- Cover the frame with your chosen skin (greenhouse plastic, canvas, shingles)
- Anchor the structure if it’s permanent (ground stakes, concrete footings, or deck attachment)
- Add a door frame by leaving one or two triangular panels open
- Install ventilation at the apex for airflow in covered domes
The modular nature of geodesic dome connectors means you can expand or reconfigure your structure later. Some builders start with a half-dome against a building, then complete the sphere once they’ve mastered the technique. Others build multiple small domes for garden coverage or event spaces.
Your first dome build teaches you the rhythm of the connector system. By the time you reach the top, you’ll understand why this design has fascinated architects and DIYers for decades. The strength-to-weight ratio and enclosed volume per material used remain unmatched by conventional framing methods.
Questions
What size lumber works with geodesic dome connectors for 2x4 builds?
Standard dimensional 2x4 lumber works with most connector systems designed for wood struts. Verify that your specific connectors accommodate the actual 1.5 x 3.5 inch dimensions of milled 2x4s, and choose straight boards without large knots near the connection points for maximum strength.
Can I build a geodesic dome alone or do I need help?
Domes under 8 feet in diameter can be assembled solo if you use temporary supports. Anything larger requires at least one helper to hold sections in place while you connect struts, especially when installing the upper rows and top cap where geometry becomes critical.
How do I know if I need 2v or 3v geodesic dome connectors?
Choose 2v connectors for simpler builds under 16 feet with fewer connection points and longer struts. Opt for 3v connectors when you want a more spherical shape, are building a larger dome over 16 feet, or need the increased panel count for mixed covering materials. Most beginners start with 2v designs.
Are 3D printed geodesic dome connectors strong enough for outdoor use?
3D printed connectors work for temporary or small-scale outdoor domes when printed in weather-resistant filament like PETG or ASA with 100% infill. For permanent structures or domes larger than 10 feet, metal or injection-molded connectors provide better UV resistance and load capacity.
Where can I find geodesic dome connectors for sale with bulk discounts?
Complete connector kits and individual hubs are available through specialized dome suppliers, with bulk pricing typically starting at 50-piece orders. Check manufacturer sites directly for contractor pricing, and use our discount code to save on orders of any size.
What tools do I need to assemble a geodome kit?
Most kits require only basic hand tools: socket wrench or drill with socket bits, adjustable wrench, tape measure, level, and a step ladder. Some systems use self-tapping screws or bolt-together connections that need no special equipment beyond what's in a typical homeowner toolbox.
Products in this guide
Shopping at Magidome? See the discount code
5% OFF All Orders
More in this series
What Size Geo Dome Do I Need for a Backyard Greenhouse?17 Sep 20265 minHow Long Does a Geodesic Dome Last Outdoors? Durability and Weather Resistance Explained17 Sep 20266 minIs a Cupola Kit Worth Adding to a Magidome Dome?17 Sep 20264 minDo Geodesic Dome Connectors Work with Standard PVC Pipe?17 Sep 20266 minGeodome Kit vs. Buying Connectors Separately: Which Option Saves You More?17 Sep 20264 min