 A Orion Motor Tech guide
How to Use a Ball Joint Press Without Damaging Your Suspension
A ball joint press lets you remove and install ball joints without damaging control arms when you follow the correct adapter sizing and press alignment steps.
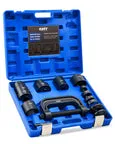
A ball joint press removes and installs ball joint assemblies by applying controlled force through adapter cups that match your control arm housing. The key to avoiding damage is choosing the correct cup size, centering the press frame, and applying steady pressure without forcing misaligned components.
Why the Right Adapter Cup Matters More Than Press Force
Most suspension damage happens because the adapter cup doesn’t match the control arm bore diameter. When the cup is too small, it concentrates force on the housing edge and cracks cast aluminum or steel. When it’s too large, the cup tilts during pressing and bends the ball joint stud.
Before you start, measure the control arm bore with calipers. A quality ball joint press kit includes cups ranging from 1.5 to 2.5 inches in common increments. Match the receiving cup to within 0.03 inches of the bore diameter so force distributes evenly across the housing lip.
Adapter selection checklist:
- Measure the old joint’s outer diameter at the press-fit shoulder
- Choose a driving cup slightly smaller than that diameter
- Select a receiving cup that sits flush against the control arm without gaps
- Confirm the threaded rod length accommodates your control arm thickness plus both cups
For multi-link suspensions with tight clearances, a C-frame press works better than a straight screw press because you can position the frame around steering components. Check the latest kit configurations to find the press style that fits your vehicle.
Step-by-Step Pressing Technique That Protects Control Arms
Here’s the sequence that works across passenger cars and light trucks:
- Secure the control arm. Clamp it in a bench vise with soft jaws, or support it on a stable press plate if working on the vehicle.
- Align the driving cup. Center the cup on the old ball joint so the press rod stays perpendicular to the control arm face.
- Thread the receiving cup. Hand-tighten it onto the opposite side of the frame with enough room for the joint to pass through.
- Make three partial turns, then check alignment. Stop and visually confirm the joint is moving straight into the bore without tilting.
- Press until the joint seats flush. You’ll feel resistance drop when the shoulder bottoms out against the control arm.
- Back off immediately. Over-pressing crushes the joint’s dust boot or deforms the housing.
For removal, reverse the cup positions. The driving cup pushes against the control arm lip while the receiving cup catches the old joint as it exits. If the joint doesn’t move after moderate force, apply penetrating oil and let it sit for 20 minutes rather than cranking harder.
Hydraulic vs Manual Ball Joint Press: Which Protects Better
Hydraulic models apply force more gradually, which reduces shock loading that can crack housings. Manual presses give you finer control over alignment but require more physical effort.
| Press Type | Best For | Alignment Control |
|---|---|---|
| Hydraulic | High-volume shops, seized joints | Moderate (must watch gauge) |
| Manual screw | DIY, precision work | Excellent (feel resistance changes) |
| C-frame manual | Tight spaces, on-vehicle work | Good (compact positioning) |
Hydraulic presses work faster on corroded joints common in northern climates, but you need to watch the pressure gauge. It’s easy to over-press without noticing, since you don’t feel the resistance the way you would on a manual press. Manual kits force you to sense when the joint seats, which prevents over-compression.
For occasional suspension work, a manual ball joint press paired with quality adapter cups delivers results identical to hydraulic models. Grab the current discount code if you’re adding this to a home garage toolkit.
Common Mistakes That Crack Control Arms and How to Avoid Them
Common errors that damage control arms include:
Using impact tools to “help” the press. Hitting the press rod with a hammer introduces shock waves that fracture cast aluminum control arms. If the joint won’t move with steady press force, the issue is alignment or corrosion, not insufficient impact.
Skipping the trial fit. Always test-fit the new joint by hand before pressing. If it doesn’t start into the bore with light thumb pressure, the bore may have debris or corrosion that needs wire-brushing.
Pressing at an angle. When the press frame isn’t parallel to the control arm face, force concentrates on one side of the housing. This creates an oval bore that causes the new joint to loosen over time.
Reusing old adapter cups with worn edges. Cups develop burrs and flat spots that gouge control arm surfaces. Inspect cups before each use and replace any with visible damage.
We also recommend installing the new ball joint immediately after removal while the control arm is still secured. This prevents dirt from entering the bore and ensures you remember the exact adapter configuration that worked.
When to Press On-Vehicle vs Removing the Control Arm
Pressing with the control arm still attached saves time but limits your ability to inspect the bore and surrounding components. We remove the arm when working on vehicles with known corrosion issues or when the joint hasn’t been replaced in over 100,000 miles.
On-vehicle pressing works well for:
- Upper ball joints on trucks with easy access
- Newer vehicles where you can verify bore condition through the old joint opening
- Situations where you’re replacing multiple suspension components in one session
Bench pressing gives you better results when:
- The control arm bushing also needs replacement
- You need to clean heavy rust from the bore
- You’re working alone and need both hands for press alignment
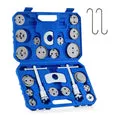
If you’re tackling a full suspension rebuild that includes brake caliper service or other steering work, pulling the control arm lets you inspect everything at once. For isolated ball joint replacement on newer vehicles, on-vehicle pressing cuts labor time in half.
Tool Maintenance That Extends Press Life and Accuracy
Clean adapter cups after every use with a wire brush and light oil. Steel cups develop surface rust in humid climates, which transfers to control arm bores and causes installation interference. We store cups in individual plastic bags with a desiccant pack to prevent corrosion.
Check the press rod threads every few months for galling or cross-threading damage. A damaged thread can bind mid-press and force you to stop with the joint half-seated. Chase the threads with a die if you feel any rough spots when hand-threading the cups.
For hydraulic models, inspect the ram seals annually and top off the hydraulic fluid reservoir. A slow leak reduces pressing force and extends cycle time, which increases the risk of overheating the joint’s bearing surfaces. Keep a spare set of seals on hand if you’re using the press weekly.
The same maintenance principles apply to other hydraulic shop tools.
Questions
Can I use a ball joint press on both upper and lower control arms?
Yes, most press kits include enough adapter cup sizes to handle upper and lower joints on passenger vehicles and light trucks. Measure both bores before starting to confirm your kit has the right cups.
How much force does it take to press out a seized ball joint?
Most joints require between 2 and 6 tons of force for removal, depending on corrosion and interference fit. If you exceed 8 tons on a manual press or 10 tons on a hydraulic model, stop and apply penetrating oil rather than risking control arm damage.
Do I need to replace the ball joint if I accidentally over-pressed it?
Yes, over-pressing compresses the joint's internal bearing surfaces and dust boot, which causes premature wear and potential separation. Always replace a joint that was pressed beyond the flush-seated position.
Can I press a ball joint without removing the control arm from the vehicle?
You can on many vehicles if you have a C-frame press that fits around steering components. On-vehicle pressing works best when you can visually confirm bore alignment and the joint hasn't been in place for more than 100,000 miles.
What size adapter cups fit most domestic truck ball joints?
Domestic trucks typically use 2.0 to 2.5 inch diameter cups for lower joints and 1.75 to 2.0 inch cups for uppers. Always measure your specific control arm bore with calipers rather than relying on generic size charts.
How do I know when the ball joint is fully seated during pressing?
You'll feel resistance drop noticeably when the joint's shoulder contacts the control arm housing. Visually, the joint body should sit flush with or slightly below the control arm surface with no gap visible around the press-fit area.
Products in this guide
 Shopping at Orion Motor Tech? See the discount code
8% OFF
Shopping at Orion Motor Tech? See the discount code
8% OFF
More in this series
How Long Do Aftermarket Brake Calipers Last Compared to OEM?20 Aug 20264 minWhat Size Lug Nuts Do I Need for My Vehicle? (M14x1.5 Thread Guide)20 Aug 20266 min Diagnosing Vacuum Leaks: Smoke Machine or Boost Leak Tester?20 Aug 20265 minDo You Really Need a Coolant Pressure Tester Kit for Home Repairs?20 Aug 20265 minOrion Motor Tech vs Harbor Freight Automotive Tools: What to Compare20 Aug 20263 min